EasyMenu 2.0: User's Guide
Introduction to EasyMenu
EasyMenu is the application which plans weekly menu and generates the shopping list. The menu planner allows to plan the menu for a week in detail, or generate a random menu - or anything it between! This saves a lot of time, money and effort. It is also environmentally friendly, for it reduces the amount of food thrown away.
What are the benefits of menu planning?
- You create a shopping list based on your menu.
- You always know what is for dinner.
- You are better prepared, which makes cooking more enjoyable.
- You waste less food, because you buy only what is in your shopping list.
- You have more variety on the table.
- You save money, because you’re eating out less and you can cook with seasonal ingredients.
The features of EasyMenu
EasyMenu has many features, some of which make it unique (e.g. Random menu generator and sharing menu in most popular Social Networking sites, like Twitter, MySpace and Facebook).
Main features of EasyMenu are:
- Cookbook with your favorite recipes
- New recipes are easy to add and edit
- Menu can be generated randomly or edited manually
- Only marked recipes from the recipes’ list are included in the generated menu
- Shopping list for the ready menu is automatically generated
- Menu can be generated for Breakfast, Lunch and Dinner, or for any combination of these three
- You can set the desired units of measurements for groceries - grams, oz or pieces for some groceries
- Ready menu, Shopping list, Summary as well as the description of all menu's recipes can be printed and shared
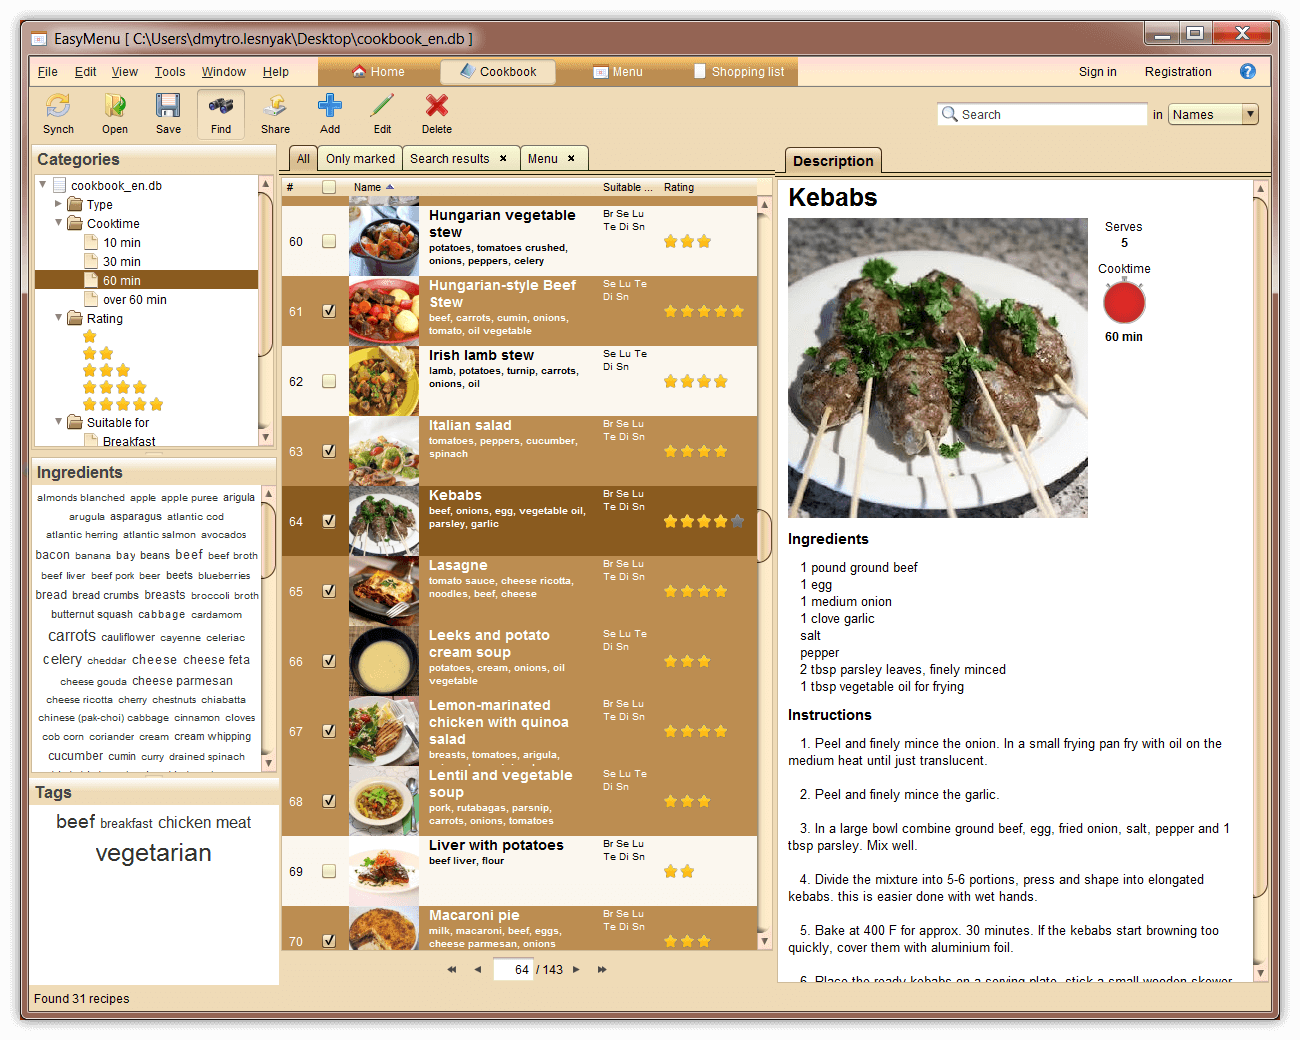
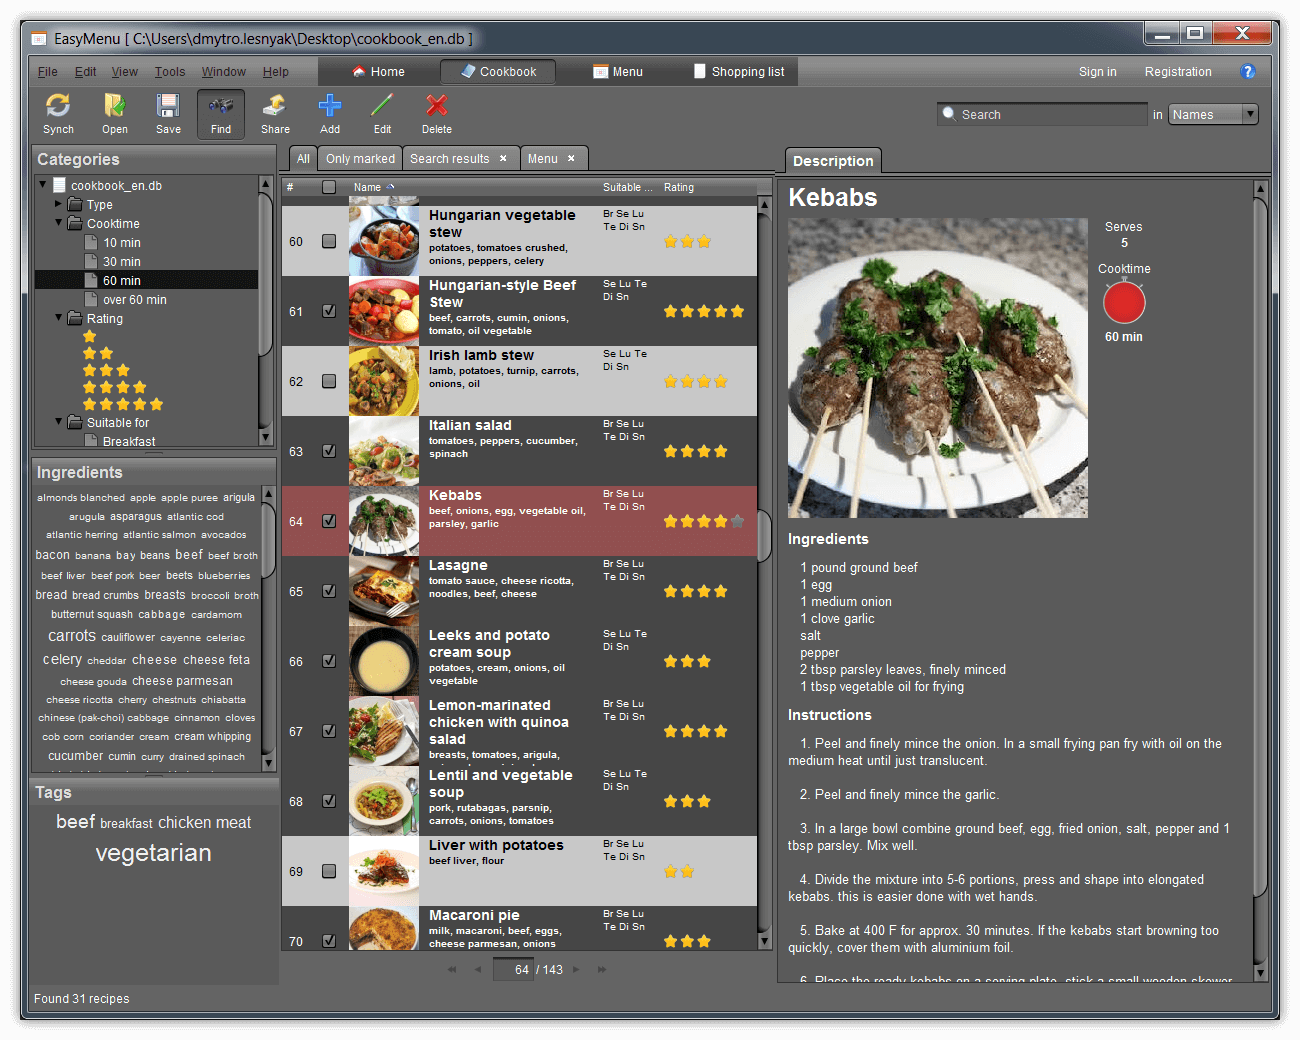
EasyMenu comes with 3 different color scheme: "Silver", "Gold" and "Dark", and two different languages: English and Russian. The color scheme and language can be easily changed from the configuration menu.
Quick Start Tutorial
Installation
To install EasyMenu, you need to download the installation package on the page "Download" and run it. After that, follow the instructions of the installation package.
Navigation between pages
When the application starts, you see the "home" page. There are 3 big buttons in the middle of the page: "Cookbook", "Menu" and "Shopping list". By clicking on one of the buttons you can quickly jump to "Cookbook", "Menu" and "Shopping list" pages correspondingly. You can switch between pages by clicking on "Home", "Cookbook", "Menu" and "Shopping list" buttons on top of the application window again.
Generate menu
To generate a new menu, select "Menu" page by clicking the corresponding button in the upper field.
If you are dissatisfied with the result, click "Refresh" button, and the menu with the same properties from the same recipes will be regenerated.
You can also Drag&Drop recipes from recipes' table into the generated "Menu".
When generating a random menu you can indicate which recipes to leave or which recipes to change, then regenerate the menu. This way you will get exactly the menu you want.
Shopping list
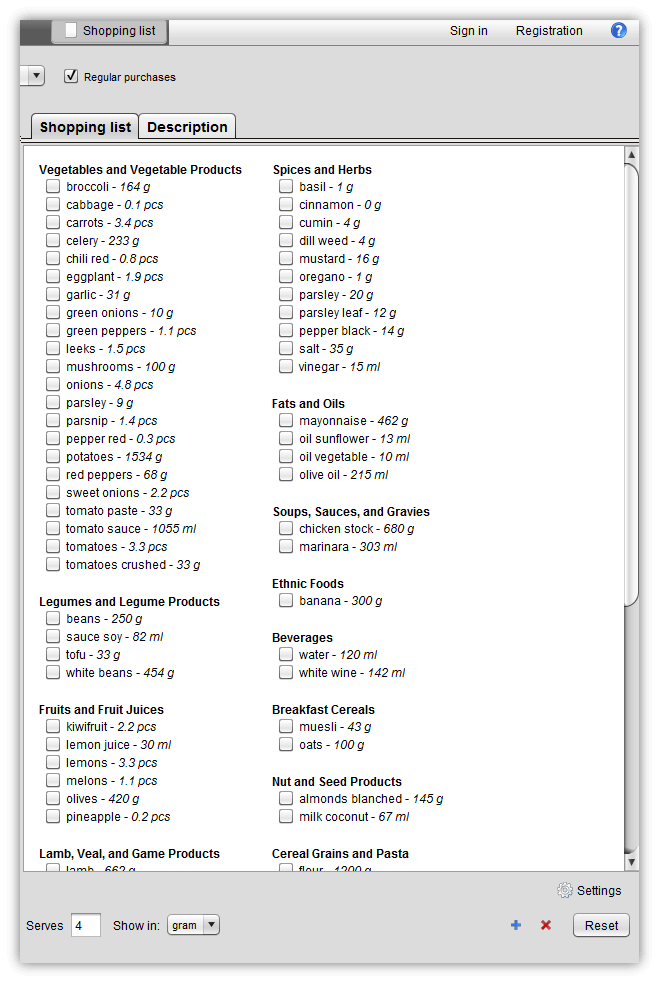
After your menu has been generated, click on the "Shopping list" tab in the upper field. You will see the shopping list which has been automatically generated for your menu.
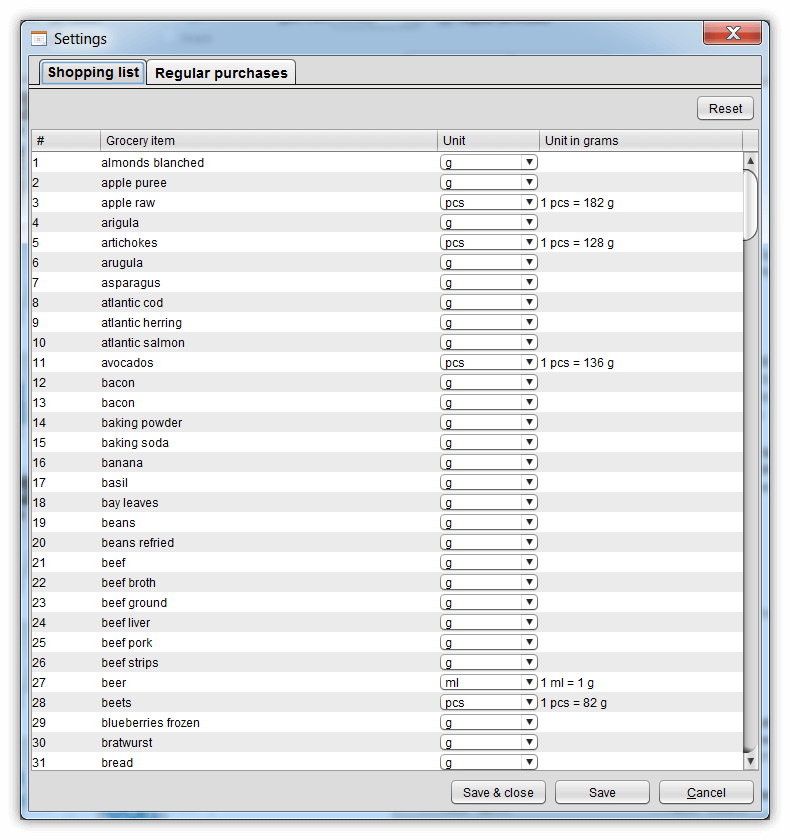
By clicking on the “settings” button you can also set the regular purchases, that is, groceries or other items you buy weekly regardless of the menu. When marked, they will appear on the shopping list.
Settings
To reach the application’s setting go to "Tools" > "Settings". There you can set the following:
- Shopping list units. You can select whether to show grams, ounces, or pieces if applicable for each individual grocery item.
- Add and edit the regular purchases, that is, groceries or other items you buy weekly regardless of the menu. When marked, they will appear on the shopping list.
Cookbook
In order to jump to "Cookbook" page, click on "Cookbook" button on "home" page or on top of the application window.
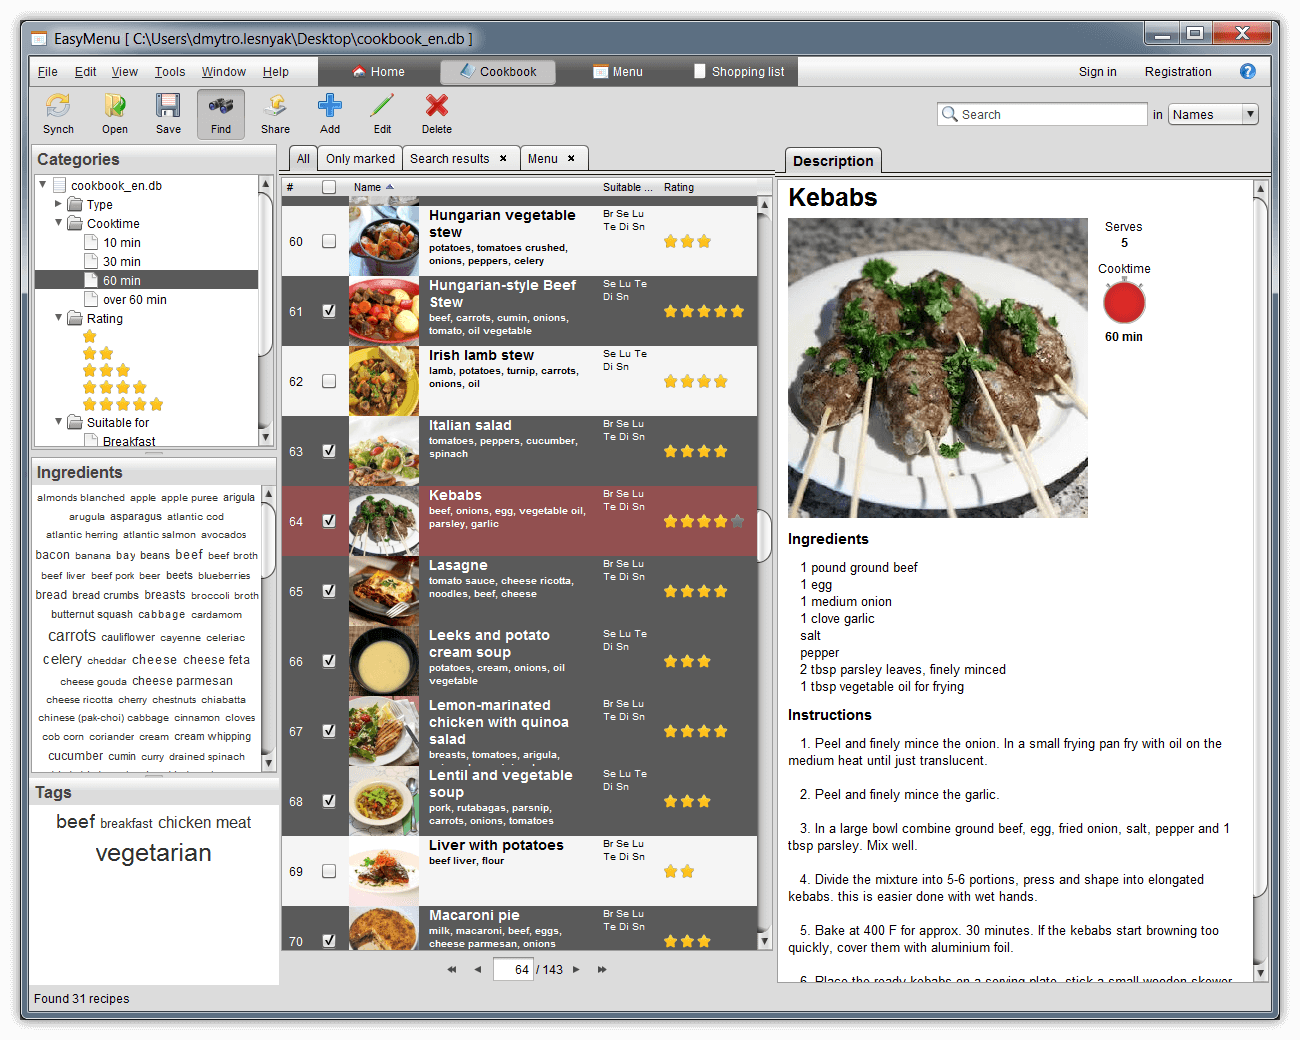
In the middle panel there are the recipes. All recipes in your cookbook are shown here and are automatically marked when the application starts for the first time. Clicking on checkbox of the recipe unmarks it, and clicking on checkbox again marks it. The recipes can be sorted according to the properties such as cooktime etc, or alphabetically.
You can also leaf through the list of the recipes using the arrows.
The right panel shows the detailed description of the recipe selected in the middle panel. It contains the picture, list of ingredients, cooking method and cooking time.
The left panels contain the search tools. Here you can select the recipes by type, rating, cooktime or ingredients. You can select several criteria by "ctrl"+click.
The middle panel consists of 5 tabs - "All", "Only marked", "Search results", "Recently added" and "Menu". "All" tab contains all recipes, whether marked or not. "Only marked" tab contains only the marked recipes. The menu will be generated only from them. When the search tools are used, the results appear in the "Search results" tab. "Recently added" tab shows recipes recently added into your cookbook. "Menu" tab shows all recipes included in generated menu.
Create new cookbook
To create a new cookbook: select "File" - "New" - "New cookbook", which will create empty cookbook.
Create demo cookbook
Demo cookbook is the one automatically downloaded with the application. To open it, go to "File" - "New" - "Demo cookbook".
Open & save
To open cookbook: select "File" - "Open" - "Open Cookbook" and select ".db" file, which contains stored recipes. You can also open individual recipes selecting "File" - "Open" - "Open Recipe(s)".
To open previously saved menu / shopping list: select "File" - "Open" - "Open Menu / Shopping list".
To save cookbook: select "File" - "Save As…" - "Save Cookbook as". It will store the cookbook on your file system in EasyMenu's ".db" format. You can also save individual recipes selecting "File" - "Save As…" - "Save Selected Recipe(s)".
To save generated menu / shopping list: select "File" - "Save As…" - "Save Menu / Shopping list". It will store the current menu and shopping list on your file system in EasyMenu's ".db" format.
Description
There are 3 different ways to see recipe's description.
- Description panel in Cookbook page
- Click on recipe in Menu or Shopping list page
- Click on "Description" tab in Shopping list page
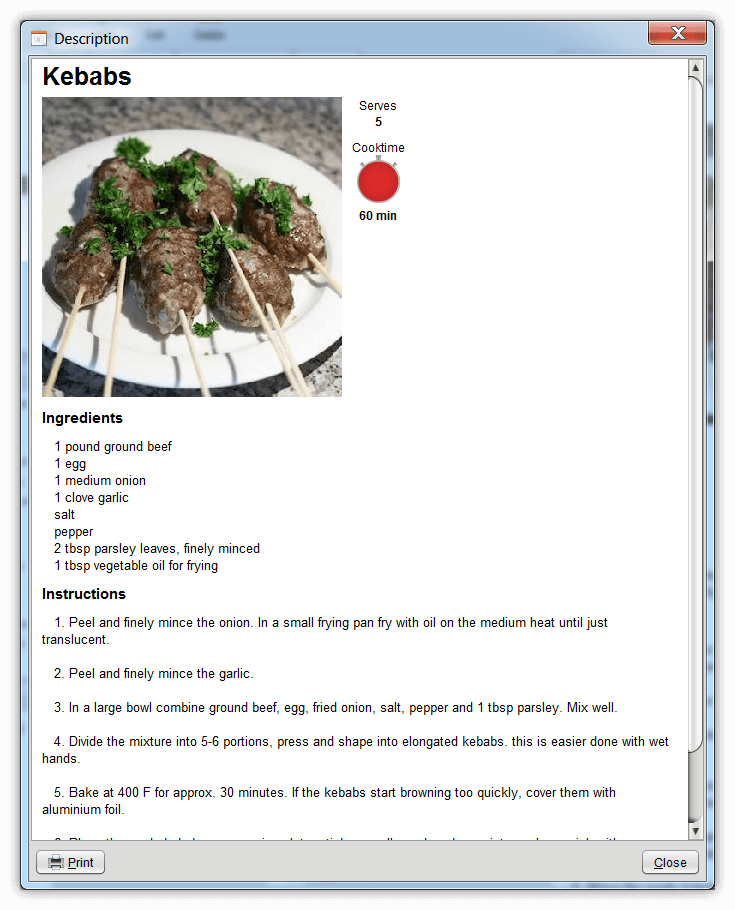
Description panel in the Cookbook page displays the description of the selected recipe. You can go back and forward to browse descriptions for all recipes displayed in Cookbook's table. Click on the description with the right mouse button and you will see the options to print and selected description.
To see individual description for a recipe of the generated menu, click on recipe's icon in Menu or Shopping list page.
To see descriptions for all recipes of generated menu, select "Description" tab in Shopping list page.
Search recipes
You can search/filter recipes using the Tree list and using the Ingredients cloud in left panel, and quick search by the recipe’s name in the top of the window. Search result will be displayed in the separate tab where you can mark or unmark recipes.
To filter the recipes using the tree menu in the left panel, click on the type of recipe you want to select. The result will be shown in the "Search results" tab, from where you can mark or unmark recipes you want to add or remove from the menu.
You can also add tags to the recipes. Then you can search the recipes by tags in the tags cloud in the left-hand panel.
You can select several criteria by holding "ctrl" and clicking on the types in the tree menu, Ingredients cloud and tags cloud in the left panel.
Add recipe
The recipes can be easily added to the cookbook.
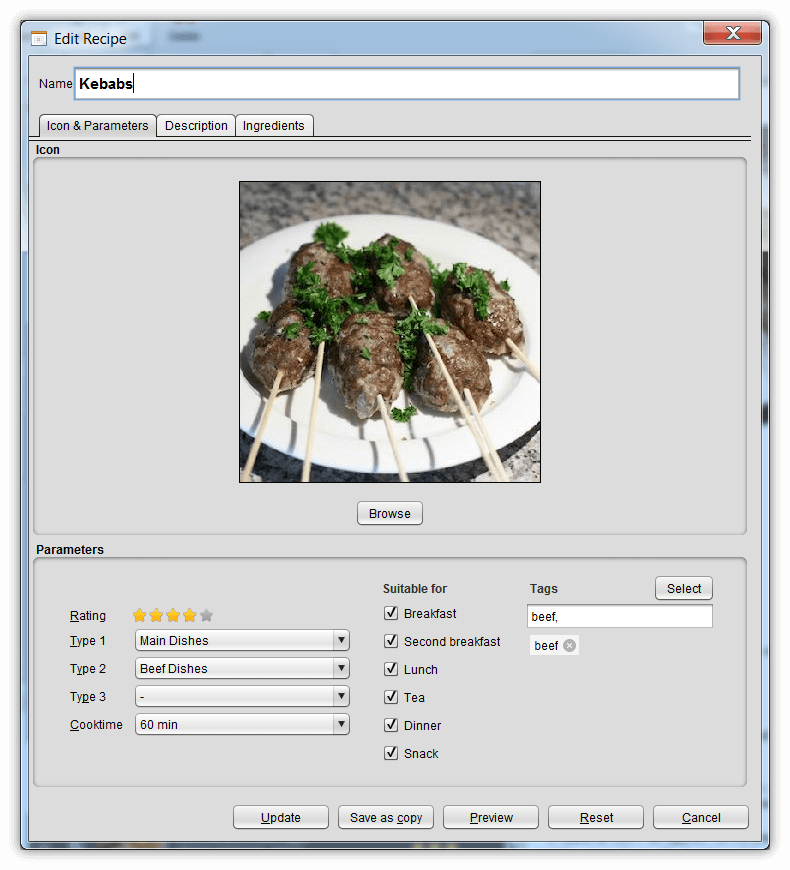
To do so, click on the "Add" button in the upper panel of the Cookbook page or select "File" - "New" - "New Recipe". Then fill in the fields - type in the title of the recipe, write a description and set the parameters in the drop-down menus below. In order to add or change the image, click on the "Browse" button.
You can specify which courses this recipe is suitable for: mark any combination of "Breakfast", "Second Breakfast", "Lunch", "Tea", "Dinner" and "Snack" in checkboxes. If unchecked - randomly generated menu will take it into account and will never place the recipe into this particular course. It is useful if you don't want that EasyMenu suggests this recipe for e.g. for breakfast when generating the random menu.
You can also add tags to your recipe.
When you are done, click "Create" below. Congratulations - you have added a recipe.
Edit recipe
The recipes can be easily edited as needed.
In order to select which recipe to edit, click on the recipe in the Cookbook page. The description of the recipe will be shown in the right panel. Then click on the "Edit" button in the upper panel of the Cookbook page or select "Edit" - "Edit Recipe". Then edit the fields as required - change the title of the recipe, edit the description and change the parameters using the drop-down menus below. In order to add or change the image, click on the "Browse" button.
You can edit which courses this recipe is suitable for: mark any combination of "Breakfast", "Second Breakfast", "Lunch", "Tea", "Dinner" and "Snack" in checkboxes. If unchecked - randomly generated menu will take it into account and will never place the recipe into this particular course. It is useful if you don't want that EasyMenu suggests this recipe for e.g. for breakfast when generating the random menu.
You can also add, remove or edit the tags associated with the recipe.
As you are done, click on "update" below. The changed recipe will appear in the list.
Add ingredients
Each recipe in your cookbook can have ingredients which will be displayed in the shopping list.
If you add a new recipe, just copy and paste description to the "Description" section in the "Add recipe" dialog and go to the "Ingredients" tab. All ingredients will be automatically parsed and displayed in the table.
If you edit an already existing recipe, just go to the "Ingredients" tab in the "Edit recipe" dialog.
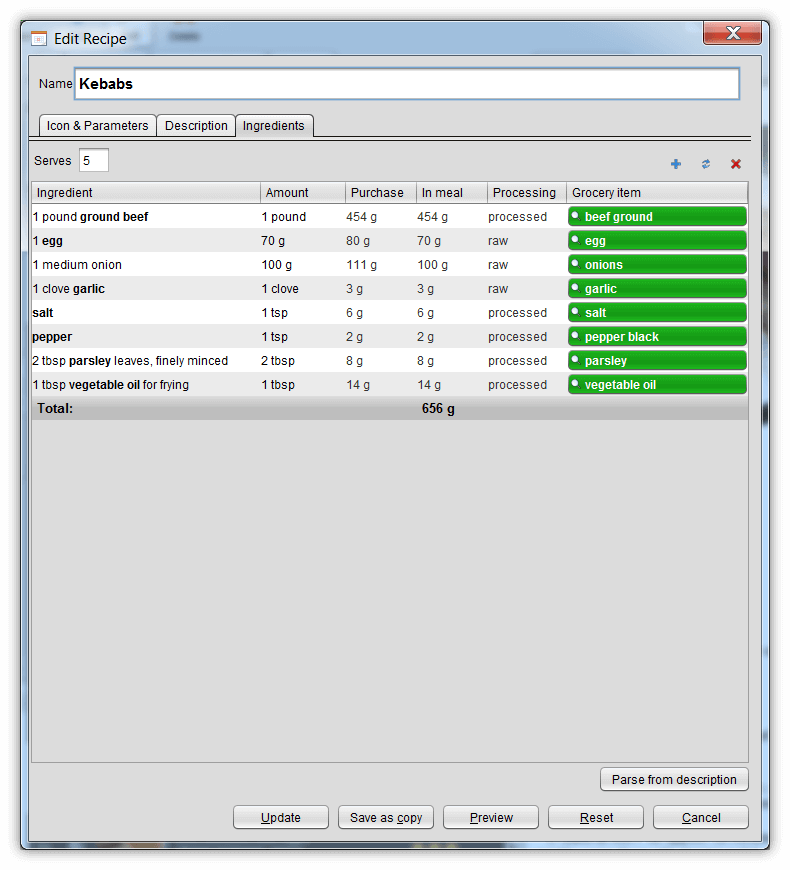
In the "Ingredients" tab you will see the ingredients table with the following columns:
- Ingredient - text extracted from your recipe's description (e.g. "200 ml coconut milk")
- Amount - amount of the ingredient extracted from the previous column (e.g. "200 ml")
- Purchase - amount of the ingredient you have to purchase in order to make the dish. This is the total amount which takes into account that some portion will not be used, e.g. potatoes will be peeled. In order for his amount to be calculated correctly you have to link the grocery item with the USDA item. If it is not yet linked, the amount will be shown in red
- In meal - the amount of the ingredient which will actually end up in the meal, e.g. already peeled potatoes. In order for his amount to be calculated correctly you have to link the grocery item with the USDA item. If it is not yet linked, the amount will be shown in red
- Processing - this field shown whether the grocery item is processed, such as boiled or preserved, or not processed
- Grocery item - a button that is used to find and link the ingredient with the food item in the USDA nutrient database. If the button is green it means that the ingredient is linked and name of Grocery item is shown. If the button is red then the ingredient is not linked.
You can edit the field "amount" by double clicking on it. The fields "purchase", "in meal" and "processing" can not be changed, they are calculated automatically based on the "amount" field.
The "Grocery item" column always tries to link your ingredient with the nutrition data automatically. It is done based on the text in the "Ingredient" column and nutrition items already linked before.
Use the "Parse from description" button to parse updated ingredients table from the "Description" tab again.
Delete recipes
You can easily delete the recipe you wish. To do so:
- Select the recipe to be deleted by clicking the row with recipe in the "Cookbook" page. The recipe details and description will appear in the right panel.
- Click "Delete" button in the upper panel or select "Edit" - "Delete recipe(s)".
- The application will ask whether you really want to delete the recipe, and if you selected several recipes, it will list all by name. If you are sure, click OK.
Note that this operation deletes the recipe permanently, and should be used with caution. Only the users of the full version of EasyMenu have the possibility of recovering deleted recipes.
Menu
Mark recipes
When the application starts for the first time, all recipes are automatically marked and are shown in the "All" tab.
You can unmark recipe which you definitely do not want to cook and which will not be included in generated menu. Do so by clicking the checkbox of the recipe. Mark the recipe which will be included in your menu for next week from the list of your favorite recipes by clicking on checkbox again.
The final menu will be generated only from the marked recipes. They show in the "Only marked" tab.
Generate menu
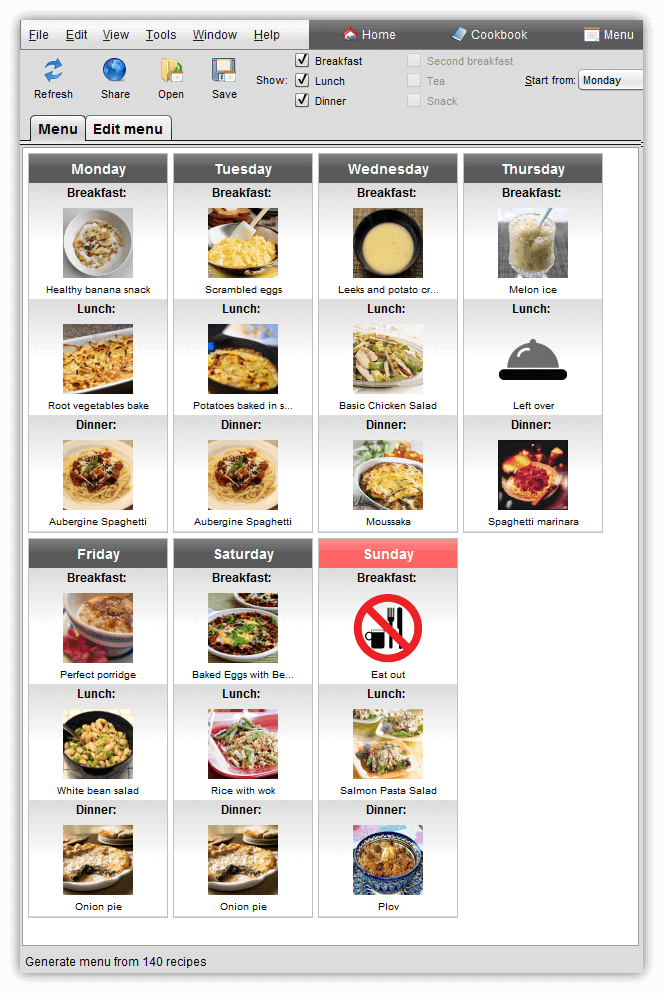
The menu is generated from the recipes currently marked and appearing in the "Only marked" tab. After the recipes are marked, select "Menu" page by clicking the corresponding button in the upper field. You will get a menu from all recipes you marked.
If you are dissatisfied with the result, click "Refresh" button, and the menu with the same properties from the same marked recipes will be regenerated. Alternatively, click on "Edit menu" and change the menu properties as described below.
When generating a random menu you can also indicate which recipes to leave and which recipes to change, and then regenerate the menu. This way you will get exactly the menu you wish.
You can also Drag&Drop recipes from recipes' table into the generated "Menu".
The ready menu consists of 3 tabs: "Menu", "Description" and "Shopping list", containing the menu, cooking instructions for each recipe appearing in the menu and shopping list.
Edit menu
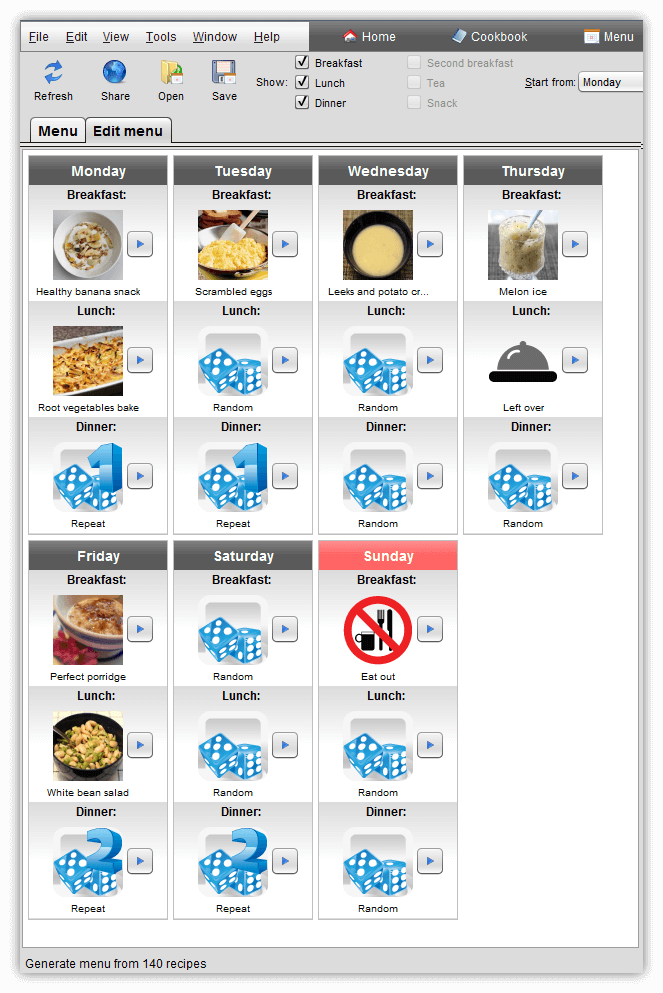
You can specify how the final menu will be generated through Menu's properties. Select "Edit menu" tab to edit Menu's properties. In the Menu's properties there are 5 different possibilities for each meal:
- Eat out - skip the meal. No recipe will be provided for this meal.
- Left over - cook meals from left over ingredients. No recipe will be provided for this meal.
- Random meal - select recipe randomly from the recipes marked by you.
- Repeat - the recipe is selected randomly, and will be repeated 1 or more times, each time the same number appears in the properties. Thus the menu will have repeated recipes. Same numbered repeats (1-15) will be the same recipes.
- Recipe name – specify the recipe to use for the meal manually from your selection.
In the full version of EasyMenu it is also possible to add several recipes per meal.
You can also Drag&Drop recipes from recipes' table into "Edit menu" tab.
You can change menu's start weekday: Monday, Tuesday, Wednesday, Thursday, Friday, Saturday, Sunday - as required. You can also specify whether Breakfast, Lunch or Dinner must be included in Menu.
Open & save
To save the menu with the shopping list: select "File" - "Save As…" - "Save Menu / Shopping list". It will store the menu with the shopping list in your file system in EasyMenu's ".db" format.
To open the menu with the shopping list: select "File" - "Open" - "Open Menu / Shopping list" and select ".db" file, which contains the stored menu with the shopping list.
Share menu
When the menu is generated, you may wish to share it in your social network. To do so, click on "Share" below the menu. You will have options what do you want to share – menu, description, shopping list and summary. After your menu is uploaded to a public server you will get a list of possible networks to share. Select the one you need and follow directions.
Generated menu can be printed either from the Internet Browser (click on "Share" button and wait until uploaded menu is opened in your Internet Browser) or directly from the EasyMenu application (select "File" -> "Print" -> "Print Menu & Shopping List" and select "Menu").
Shopping List
You can see shopping list for the generated menu in the "Shopping list" page selecting the "Shopping list" tab. You can see what needs to be bought for next week's menu and edit individual grocery items if needed, editing or adding items.
By clicking on the "settings" button you can also set the regular purchases, that is, groceries or other items you buy weekly regardless of the menu. When marked, they will appear on the shopping list.
Note that in order for the regular purchases to show in the shopping list you have to check the option "Regular purchases" in the top field.
Regular purchases
You can also set the regular purchases, that is, groceries or other items you buy weekly regardless of the menu. When marked, they will appear on the shopping list.
In order to set the regular purchases go the shopping list window, then click on the "setting" button below right. Add the regular purchases in the same way you add groceries to the shopping list. Then check the ones you need to buy, they will appear in the shopping list. Unchecked items will not appear in the shopping list. Note that for this option to work you also have to check the check the option "Regular purchases" in the top field.
Open & save
To save the menu with the shopping list: select "File" - "Save As…" - "Save Menu / Shopping list". It will store the menu with the shopping list on your file system in EasyMenu's ".db" format.
To open the menu with the shopping list: select "File" - "Open" - "Open Menu / Shopping list" and select ".db" file, which contains the stored menu with the shopping list.
Share shopping list
The shopping list can be shared in your social network the same way as generated menu. To do so, click on "Share" below the menu. You will have options what do you want to share – menu, description, shopping list and summary. After your menu is uploaded to a public server click on "Shopping list" link and after Shopping list page is opened, you will get a list of possible networks to share. Select the one you need and follow directions.
Generated shopping list (as well as the menu) can be printed either from the Internet Browser (click on "Share" button and wait until uploaded menu is opened in your Internet Browser) or directly from the EasyMenu application (select "File" -> "Print" -> "Print Menu & Shopping List" and select "Shopping list").
Settings
To reach the application’s setting go to "Tools" > "Settings". There you can set the following:
- Shopping list units. You can select whether to show grams, ounces, or pieces if applicable for each individual grocery item.
- Add and edit the regular purchases, that is, groceries or other items you buy weekly regardless of the menu. When marked, they will appear on the shopping list.
